Scanning – or not? Practical advice for the reproduction of analogue images
Why anyway?
Good
question, n‘est-ce pas? Why does one have to obtain digital
data files from
analogue (film) material? Didn’t things go well without that
for many decades? And
even if one does not adhere to the pessimistic line of thinking that
digital
will last less long than analogue data, the products of analogue
photography
have proven to be of decent quality for 190 years now. And there is no
reason
to believe this will change soon, at least for the black and white
variety.
On
the
contrary, processing a digital image to a final product often means
printing,
and I’d think there are still valid question marks behind the
long term
durability of these prints.
And
also, I
am no historian. I do have fun looking at the pictures of my parents
and
grandparents, but not more. The future of mankind does not depend on
these
pictures, certainly not. So, if color slides fade after twenty years
– so be
it, my memory fades as well.
But,
whoever wants to use digital ways of image presentation, who wants to
view them
on computer screens, TVs and with beamers, cannot avoid digitalization.
And
yes, who wishes to stop the decease of old family vacation pictures
also has no
choice.
A matter of choice
A
couple of
factors come into play when choosing the right method, some of which
are very
personal, so that eventually one method may be just right for one
person and
plain wrong for another. I have myself tried out most ways and maybe
this
indeed is the only way to decide. Maybe it is plain impossible to give
advice
in the context of such an article, I don’t know.
But
since I
am asked every now and then, I will at least try.
The joy of using a computer
This
may
well be one of those personal factors.
The
amount of computer work the different methods bring with them is
grossly
different and this may either spoil the day (week) for one, while
another
person spends the day in front of the computer anyway and even pulls
satisfaction from the scanning work, in that it makes him feel he is
creative …
sort of.
I
personally would rather spend less
time in front of the screen, where I already spend most of my working
hours. To
me, image processing is annoying as such - will nevertheless try to
assess the
effort needed.
Resolution as a fetish – what
do we
really need?
Extracting
the very last detail out of an analogue image requires an extensive
amount of
time, money and effort and also yields enormous data files for further
processing. One reason is that even one single film grain must not be
seen as a
digital entity. Instead, the representation
of film grain influences the quality of the resulting digital image. So
if all of a film image is to be
captured,
much more than the actual analogue resolution is needed in the
recording
medium.
This
is
even more pronounced with smaller film formats (e.g. 35mm), offering
reduced
resolution because of their smaller area. I would not want to dive into
the
discussion just how high 35mm
resolution can possibly be in the ideal world. What can be said though
is that
here, the final output may indeed show the limited resolution of the
input, so
that one should be careful not to throw away quality while scanning.
What
can be done, can be seen here
http://forum.digitalfotonetz.de/viewtopic.php?t=71236&highlight=scannertest
and
here
In
both
comparisons, the collective intelligence of the photographic community
was
used, which seems more appropriate to me than relying on individual web
sites
like www.filmscanner.info (this one being even more
suspect
for their permanent recommendation of the dreadful Silverfast
software).
On
the
other hand, the resolution the image offers from the beginning is not
needed
most of the time, be it for moderately sized prints or beamer
projection or
whatever.
So
a person
who, even after serious questioning, still maintains that he is not
interested in extracting more from an old slide than is necessary to
produce a
4x5” print or a “Full HD” screen image,
can save a lot of effort.
However,
this self-limitation needs to hold up in future as well. Who cannot
rule out
the possibility that at one point in the future his expectation may be
different, should prepare for this today, especially if thousands of
analogue
images are waiting to be reproduced.
If,
for
example, a scanning project met the world standard “Full
HD” (1920 x 1080)
resolution ten years ago, the resulting images fill only a quarter of a
4K TV
screen today, and who has such slide shows can call himself lucky if
the raw
data supports 4K and only requires him to compile the slide shows
again. If
not, he has to start all over again (while the old slides have faded
even more
in the meantime).
Or
maybe,
he doesn’t care at all and still loves his pictures, which is
just as well.
Scratches, dust, color casts - and color
negatives
Depending
on how prominent they are on the source material, these issues can
determine
which method is to be used. Also,
who
has many color negatives will in the end select an off-the-shelf
scanner with
adequate software, with which the de-masking of the negatives and the
conversion to a positive can be done more or less automatic. This can be done manually as well and the
steps to be performed can be standardized, but the effort
is much higher still.
The
same goes
for scratches, dust and color casts. Scanners can correct these easily
and with
impressive results. The exception is scratches, which cannot be
corrected automatically
on black and white (silver) film and on Kodachrome slides.
On
the other
hand, somebody only planning to shoot an occasional film will probably
take
slide film which, fresh from the developing agent, will show no color
cast nor
scratches and hardly any dust.
Numbers
This
may
also be a deciding factor. When I started reproducing images, I had
almost
11.000 slides in front of me and I still have many negatives to look
at. Such
quantities can only be coped with as a pensioner (if at all), and
nobody would
want to stay on this 24/7.
And
luckily, you don’t have to, since there are methods available
for large numbers
of images as well.
Today,
all
my slides are long digitized and I do not worry about the remaining
black and
whites – and I happily reproduce the occasional slide film in
between.
Cost
It
is
fairly easy to spend 5 digit sums on scanning gear and indeed, good
equipment
cannot be had for free, but it is possible to get away cheaper,
especially if
the own camera kit already contains some of the necessary bits. It is
more
important to make up one’s mind regarding the required
quality and the
quantities. I will nevertheless try assess the cost when discussing the
various
methods.
Formats
This
obviously determines everything. If you only have 35mm format, you live
in a
different world than somebody who owns medium format or even sheet film
or
glass plates. It may be advisable to use more than one method in
parallel,
which is what I did. For really
large
formats, there is no way around a flatbed scanner, which is less
suitable for
35mm – more on that below.
Different Routes
Flatbed Scanners
Even
many
copiers have a scanning unit built in, these days. If it also has a
transparency unit you are all set – in principle. At first
sight, these are
fascinating pieces of gear, you can print, send fax messages, heat your
flat,
brew coffee – and scan your collection of slides on top of
that.
But
clearly, the output quality is limited and the scan times are often
endless. If
you really have thousands of images to scan, just forget all flatbed
scanners.
The time required to feed the slides to the holder (four of them at a
time,
typically) and to start the next scan process clearly shows you
don’t want to
do that for the rest of your life. On top of that, scan times become
longer and
longer if you wish to use the available resolution of the thing. The
nominal
resolution of flatbed scanners is often impressively high (as are the
resulting
file sizes). The reality test however shows, that a flatbed scanner can
hardly
read what is in a 35mm slide. One does a little better than another one
but in
the end, they all fail to work well on small formats.
This
does
not mean that the resulting images don’t look nice, but to
obtain a decent
20x30cm print from a flatbed scanned 35mm slide or a really nice 4K
screen
representation – rather not.
This
looks
a little different when medium format film is concerned. There, the
achievable
quality is high enough to meet all reasonable expectations (though at
very long
scan times), but even then, you need to accept that the film carries
more
information than the scanner is able to extract.
In
return
you get very simple processing. The software offered by the
manufacturers (namely
Canon) is pretty foolproof and way more usable than e.g.
“Silverfast”.
Prices
are
moderate. A current (or recent) Canon model (8600, 8800, 9000) can be
had for
under 200 Euros new – and for a lot less used. When buying a
used model,
carefully check if current Windows drivers are available.
Who
possesses large format film or glass plates (beyond medium format) has
no real
choice other than looking for an Epson flatbed or an old Canon 9900F.
+ Moderately
priced, many second hand offers
+
Usable
software
+
Scratches,
color casts can often be removed automatically
+
Easy to
use
+
Can work
with larger film formats
+
Can work
with exotic film formats if holders are available (or custom made)
-
Needs
desk space
-
Makes
noises
-
Achievable resolution below that of the source material (more or less)
-
Scan
times can be incredibly long, depending on resolution and processing
power
Film Scanners
This
is the
classic way to scan a film, as the name suggests. There is hardly any
market
left for new scanners or for those, from which good service can
reasonably be
expected for another while, and for older scanners there Is no support
in the
sense of drivers for later operating systems. It appears as if
manufacturers
have given up on this product category, even Nikon, who have made
top-of-the-line products for many years.
It
is still
possible to buy new (or like new) Nikon 9000 scanners for medium format
or 5000
(for 35mm) but I would not recommend doing that, prices are out of this
world.
There are very few serious film scanners left new: Plustek 8200 or
Reflekta
RPS10M for 35mm which I do not know much about. For medium format,
there is the
Plustek Opticfilm 120 that I have intimate knowledge of and which
surpasses
both 35mm scanners in price, not only format.
Indeed
the
Plustek 120 can extract what is in a piece of film. Still, working with
it is
not much fun, which is mainly due to the incredibly cumbersome and
faulty
Silverfast software and, to a lesser extent, because of its sensitivity
towards
film that does not lie flat.
And
like
with flatbed scanners, long scan times should not bother you. A color
scan from
a 2x3” medium format slide takes roundabout one hour if
optimum quality is the
objective, even on a pretty fast computer – not a good choice
for larger
quantities.
+ Can
reproduce the resolution of the source material (depending on model)
+
Needs a
little less space than a flatbed scanner
-
Not for
all film formats, or needs special adapters
-
Sensitive
if film material does not lie flat (most are)
-
Makes
noises
-
Scan
times can be incredibly long, depending on format and quality
-
Can be
pretty expensive
Reproducing slides from a slide projector
This
method
will not work without some Do-It-Yourself effort and also not without
some care
– and it only works for 35mm slides. What you need is a slide
projector and a
DSLR with a macro lens of longer focal length (to ensure a certain
working distance
between projector and camera).
First,
the
projector lens is removed and the DSLR camera positioned in front of
it,
looking inside the projector. Camera and projector need to be
positioned such
that the camera exactly captures the full frame of the slide in the
projector –
which takes some time. Once set up however, this method is very, very
fast and
well suitable to cope with any number of slides to be reproduced. One
prerequisite is that all slides are positioned in landscape format.
When that
is done and if the projector even has a timer, this can be set to two
seconds
and you can fire away on the camera in the rhythm of the projector, and
can
finish a 50 slides magazine in two minutes.
Sure,
there
is work left to be done on the computer, but the better the setup was,
the less
work remains.
Depending
on the kind of projector it is possible that the illumination of the
slides is
a little uneven. If that is the case, the “heat
filter” (a thick piece of glass
in the projector condenser housing) can be replaced by a frosted
alternative
made to measure by a local shop.
I
recommend
stopping down to only f4 or f5.6. If apertures f8 or f11 are used, the
illumination again becomes uneven, because scratches etc. become
visible as
shadows.
Step-by-step
instructions can be found on the web. While this certainly is very
“home made”,
the results are pretty good and should you already own a macro lens, it
is
certainly worth a try.
+ very good even for very large quantities
+
„almost“
captures the source material resolution
-
needs
time for preparation and set-up
-
no
automatic image processing (dust removal)
-
only for
35mm slides
Scanning “in” a slide
projector
This
is
about the series of „DigitDia“ slide scanners
offered by Reflekta (and its
derivatives sold under the “Braun “ name). Their
price is relatively high but
still a good alternative for 35mm slides. Scan times are again long but
at
least the thing can process a complete slide tray in one go, so that
you can go
to bed and check the results the next morning.
Quite
commonly, such gear is purchased to scan the own slide collection and
then
resold with moderate loss. If you still have a – slower
– method available to
scan an occasional slide film, this is a good choice.
+
Very good
even for very large quantities
+
Not cheap
but can be easily resold
-
„Almost“
captures the source material resolution
-
Scratches,
and dust can be removed automatically
-
Only for
35mm slides
Reproducing film from a light panel
A
very good
method, which heavily depends on the resolution of the digital camera
used.
While dedicated film scanners were miles ahead only a few years ago,
the
resolution of (affordable) full frame DSLRs is a good match now. Even a
Sony A7
or Canon 6D can capture all there is in a 35mm slide (well almost
all…) - if
equipped with a good macro lens. And you also get the option to adjust
every
single exposure via the live view histogram.
Naturally,
the disadvantage is that there are no automatic image corrections
available, for
dust nor for scratches, and there still remains computer work anyway.
While the
act of photographing the slides is really quick (even for larger
quantities),
developing the raw files talks a long time on almost any computer.
Color
negatives pose another restriction. While those can be reproduced just
the same
in principle, filtering away the orange mask and correcting the color
is
tedious and time consuming. I have made sure I had captured all color
negatives
in my possession with the film scanner, before eventually moving to
this method
entirely.
A
very nice
aspect is that you are not limited to any film format, even if you wish
to use
the full resolution of the camera. Medium or large format images can be
reproduced crop after crop and the resulting images mounted again with
a
panorama program later. I use an early version of
„Autopano“ and the whole
process works much better than it may sound.
For
an
occasional roll film this is very feasible and does not take longer
than the
process using a film scanner – at comparably good quality
+
Can
reproduce the resolution of the source material (depending on camera
resolution)
+
Manual
adjustments possible
-
No
automatic software corrections (e.g. dust removal)
-
Considerable computer work necessary
Practical Advice
As
can be gathered
from the above, I have had mixed experiences with the various scan
methods,
while reproducing film from a light panel or from a slide projector
turned out to be pretty successful.
However this simple advice needs one cautious remark: Who really does
not want
to set-up and adjust gear and do some minor DIY every now and then,
should
rather invest in a of-the-shelf unit. Who has limited budget, should
buy a used
flatbed scanner. And who has very large numbers of slides, should look
at a Reflecta
Digitdia.
On
the
other hand, I think that who already owns a DSLR and a macro lens,
should at
least try using these and a light panel – the results can be
surprisingly good,
including the mounting of crops to a complete picture with high
resolution.
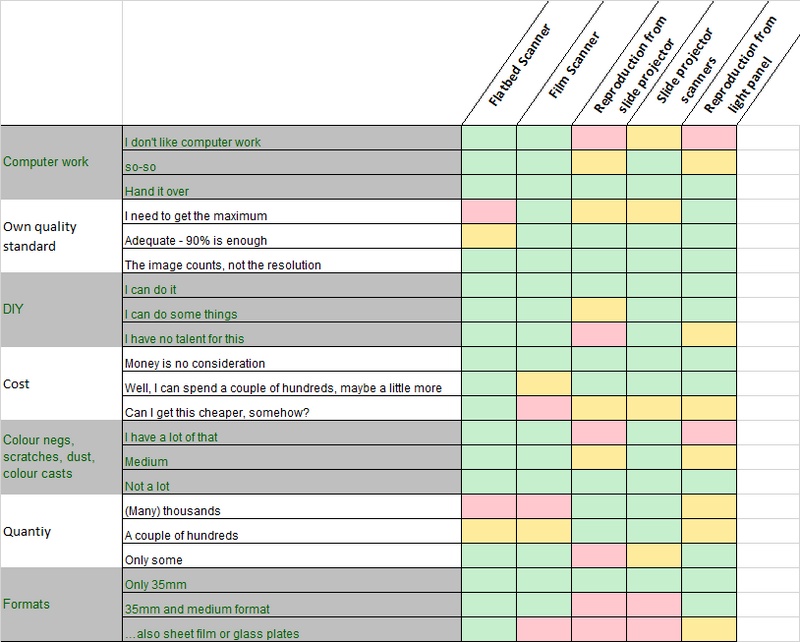
The
following table may also be of help, in which I have noted my
assessment of the
methods discussed. Red means a no-go, yellow stands for “yes
with some reservations"
– and green means go ahead…